In this course you will make a handwriting recognizer. The objective is to do some experiments and write a scientific report.
In the first practical session you will:
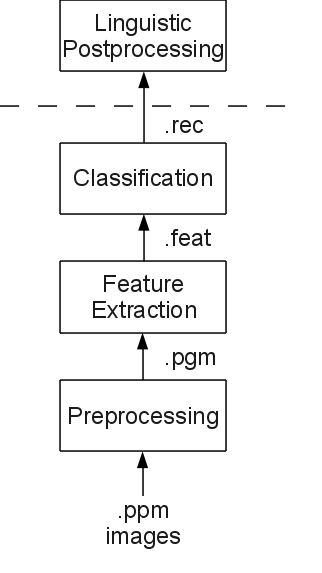
Most handwriting recognition systems are built as shown in the pipeline-figure.
The first three assignments correspond to the first three blocks in the pipeline:
We will move through these steps in a very high tempo, and spend more time on the final part: Linguistic postprocessing. The reason for this is that currently Monk is a state of the art system for doing handwriting retrieval, but not much has been done with the language aspect yet. This postprocessing step is exciting and will likely improve the results of the recognition system.
You are encouraged to work in groups of 2 or 3 persons, since it is a lot of work (especially on your own). However, at the end of the course you must write a scientific report on your recognizer individually.
Your work is handed in by e-mail to Jean-Paul. Code is handed in in tar.gz format, written documents as PDF. Be sure to include your names and assignment number in the filenames (of both code and report). Your name should also be in the PDF of your report. Please follow these rules to minimize administrative overload.
The code may be in Python, C, C++, Java or Bash (for quick scripting). If you want to use a different language, be sure to contact Jean-Paul first to check if that is okay. The general rule is that it must be able to run on a default AI machine.
If your code has compilation steps, provide a Makefile which takes care of the
compilation process (i.e., just a simple make call).
For assignment 1, your code is called through an executable called prepro.
This program will receive two arguments: the input file (in .ppm format) and
the name of the output file (which should be in .pgm format). C++ code is
provided for reading and writing .ppm and .pgm files. See
/home/student/vakken/hwr/toolbox. If you are not an AI-student, ask
Jean-Paul for a temporary account.
The executables are explained below for each step. For each assignment, you only have to hand in the part for that step (so for the first assignment, just hand in everything needed to do the preprocessing step).
The pipeline image above also shows what kind of files are passed on to the next step. Each time the executables are being passed existing files and the location of a yet non-existent file. Process the existing file and place the result in the non-existent file, which is then passed on to the next step.
| Step | Executable | arguments | Explanation |
|---|---|---|---|
| Preprocessing | prepro |
original.ppm preprocessed.pgm |
Cleaning up the image and transforming into grayscale |
| Feature extraction | feat_extract |
preprocessed.pgm featurefile.feat |
extracting features from the preprocessed image. File format is:
|
| Classification | classify |
featurefile.feat class.rec |
Classification of the image. The resulting file should contain a
list of class hypotheses in this format:
|
The .rec files from the classification step are used to determine the top1
and top5 score, meaning how often the correct class label occurs in the
first, and first five returned labels.
You can find the image-files in /home/student/vakken/hwr/data/train/. The
filenames contain the class-label, a dash (-) and a number (i.e.,
Rappt-0063.ppm). Therefore you can find the class-label from the filename
without extension, up to the last 5 characters (Rappt).
Don’t copy these files to your own home-directory!
Tip: You can use the /dev/shm “shared memory device” as a fast-disk to store
temporary files.
Last modified: April 27, 2011, by Jean-Paul van Oosten
Part of the HWR course